Deploy simple React App locally with Vite & NPM.
Step by step guide for installing simple React App.


Note: This article was first published here: (Vite Deploys (github.com))
PART 1: Creating a basic folder structure for React Project
Open your VS Code terminal and run the following command in any folder to create a new Vite project with React support:
npm create vite@latest my-react-project --template react

Replace my-react-project with any project name. This will be your folder name.
Then Select React from the below screen

Select Javascript

That's it you will see a command to proceed further:

After that, there are 2 steps:
- Navigate to the project directory created with the name you chose earlier. Here
cd my-react-projectwill navigate to the folder created.

- You now need to type
code .that is code spacebar and dot - this will open your newly createdmy-react-projectin a new window.

Now we will begin. Open the terminal using Windows + backtick and install packages

Packages will keep getting installed and you will see a progress bar.

Once you are done installing you will see the terminal free again to type. You can ignore these warnings.

You can install packages you don't see installed in the package.json file and you require for your project using npm install <package name> Here I am installing react-router and react-router-dom

Now I have installed all the required packages, So I am going to deploy this project using the npm run dev command. This command was displayed just after the my-react-project creation using the npm command.

Now running npm run dev the project is deployed and you can view it on your browser. Click on the link or type the link to see your deployed project.

You can see it deployed like this:

THIS IS PART 1 - Where we just create a basic folder structure to start our React project.
In Part 2 - We will see git repository initialization and publishing to remote, and also about the folder structure.
PART 2: Additional work to deploying React Project: Git + Looking at folder structure.
Git repository initialization and publishing to remote on Github.com
If we look at the terminal now, we can see that project is deployed but we can't use the same terminal, so we add a new split terminal through the below setting. This terminal will be used for Git purposes.

We now have a split terminal ready to do our project.

The left side terminal will keep showing warnings and errors as we add more code. So use it to read the errors. If needed to check errors - you can also see this in the console of Inspect browser
The right side of the terminal should be used for git purposes.
Now what we have done is just created a local directory with just the files created by running the command. To confirm if the git repository is created or not, we will run the git status command.
As you can see below no repository exists, so file changes we do may not be tracked. We need to create a Git repository now.

To create a git repository use git init
This will make an empty repository for the folder.

Next, we need to add the files to this git repository. So we use git add . git add dot to add all the files created till now to the git repository just created.

Now all the files are staged, we can commit these files using Git command git commit -m "initial setup" This will commit the staged changes with the commit message as "initial setup.


Now we have successfully saved all changes made till now to a git repository but the changes are there only in the local machine.
Let's connect it to the remote repository:
To connect to a remote repository - publish branch - this will prompt you to create a new repository with the same name.

This will prompt you to create a GitHub repository with the same name or you can change the name also in the text box: Select either - to create a public or private repository.

While publishing you can see progress here:

Once published, you can ignore the pull request notification and click on Open on GitHub to see the repository created.

Here's the repository created online:

You can now visit the terminal again and type clear to clear the terminal of previous messages.

NOTE: Once the branch is published you can push the committed code to remote using git push origin <main/master>


Now let's look at the folder structure

You can remove or edit any of the files here.
To start from scratch
Remove CSS configurations entirely from
App.cssandindex.cssYou can also entirely remove contents from
App.jsxfile

NOTE: If you planning to use React Router then you can also set it up. Here main.jsx is the file like index.jsx in CRA.
- Import
BrowserRouterafter making sure thatreact-routerandreact-router-domare added inpackage.jsonfile.
As you keep adding more code, the alignment of the code written may look messy. Use Prettier VS Code Extension and then right-click and Format Document If a popup comes select Prettier and then you can see code formatted to look cleaner in view.

Wrap the BrowserRouter around <App/> and then proceed to make a <Home/> componet

- You can then set up the Router in
App.jsxwith routes as<Route path="/" element={<Home />} />which is wrapped around<Routes> </Routes>


For subsequent changes along with Ctrl + S or Autosaving on VS Code, You also need to do:
git add .( to stage or add all files saved till now to git history )git commit -m "<commit message>"git push origin <branchname>
If you close the session of VS Code which has the terminal running updates from the server - the server is also stopped. If you restart VS Code again, navigate to folder and re-start the server with npm run dev Then use split terminal to run the git commands.

NOTE: If you have deployed your React app via Github repository to Netlify, all the changes will be read and for every commit - there will be deploys on Netlify - if there are errors during development - some builds will fail. Resolve errors to deploy on Netlify / Vercel successfully.
Make sure to import necessary packages to avoid errors. If you do not see any error during runtime and just see blank screen, you can check console in Inspect Browser
PS: If you rather want to see the error on screen during local deployment, add this code in App.jsx file after import statements.
import './App.css'
import { Routes, Route } from "react-router-dom"
// import { Home } from './Home'

if (import.meta.env.DEV) {
  window.onerror = (event, source, lineno, colno, err) => {
    const ErrorOverlay = customElements.get('vite-error-overlay');
    if (!ErrorOverlay) {
      return;
    }
    const overlay = new ErrorOverlay(err);
    document.body.appendChild(overlay);
  };
}
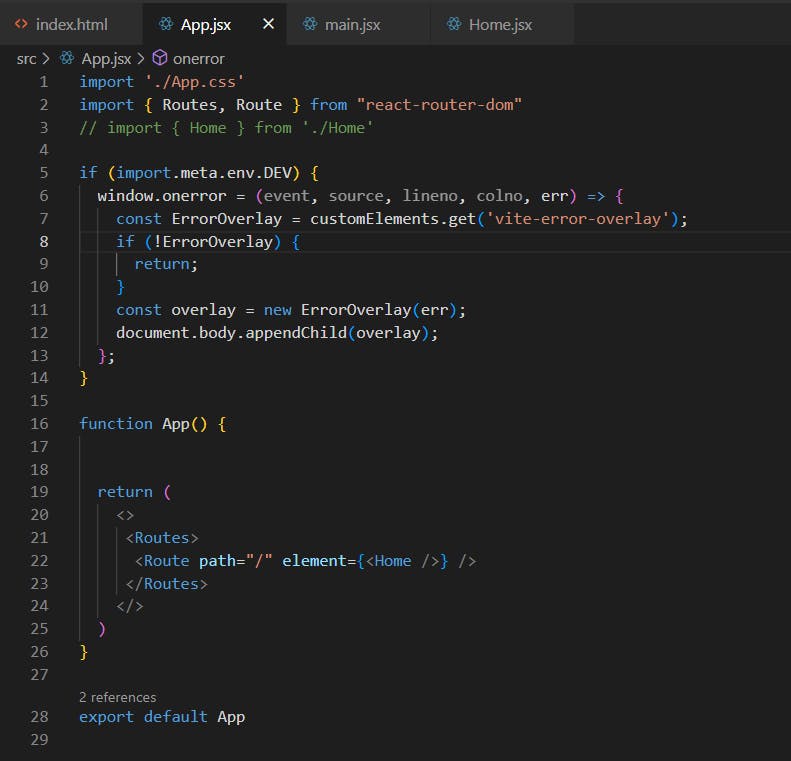
This will show error now like this:

Resources: